
Essential Insights for Your Dashboard Warning
- Loose Gas Cap & Oxygen Sensor: These are among the most frequent and often easiest-to-fix culprits, accounting for a significant portion of check engine light triggers.
- Flashing Light Means Urgent Action: A blinking check engine light signals a serious issue, such as a severe engine misfire, that requires immediate attention to prevent costly damage to your catalytic converter.
- OBD-II Scanner is Your Best Friend: Investing in an affordable OBD-II scanner or utilizing free services at auto parts stores is the quickest way to diagnose the specific problem with diagnostic trouble codes (DTCs).
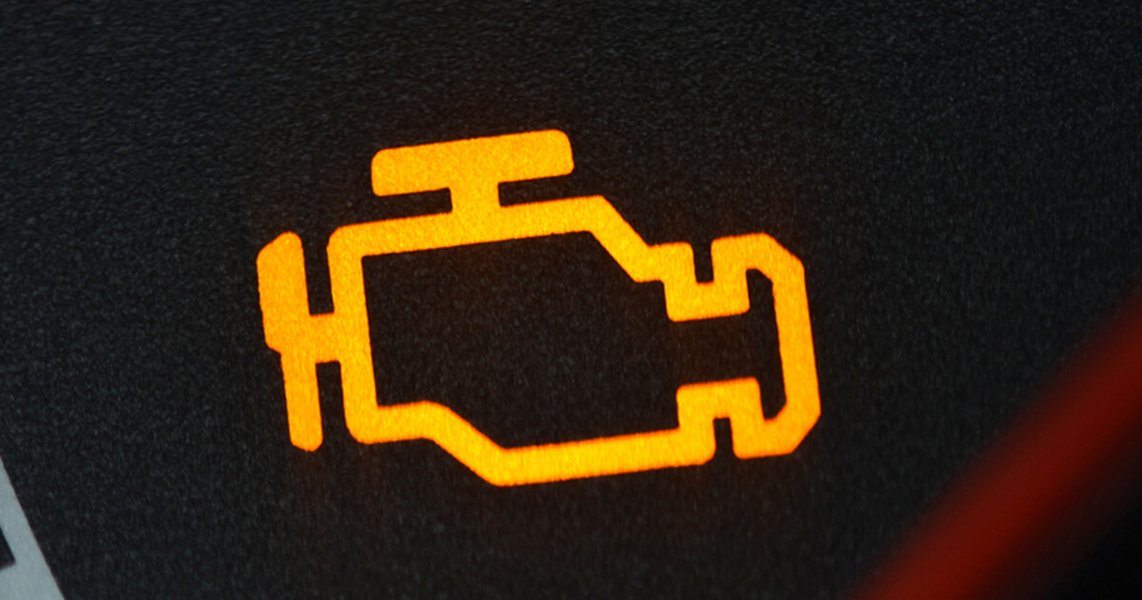
That little engine icon illuminating on your dashboard can instantly send a jolt of anxiety through any driver. You're cruising along, perhaps on your daily commute or a weekend getaway, when suddenly, a yellow or orange light glows to life. This isn't just any light; it's your car's way of telling you that its sophisticated onboard diagnostics (OBD-II) system has detected an irregularity. While it can signal anything from a minor, easily fixable issue to a more serious mechanical concern, understanding the common check engine light causes and knowing how to respond can significantly reduce stress and potentially save you from significant repair bills down the road.
This comprehensive guide aims to demystify the check engine light, explaining its purpose, the most frequent triggers, and actionable steps you can take to diagnose and resolve the underlying problem. Our goal is to empower you with the knowledge to handle this common automotive warning with confidence, turning potential panic into proactive problem-solving.
Important Note: The check engine light, also known as the Malfunction Indicator Lamp (MIL), doesn't pinpoint the exact issue. Instead, it serves as a general warning that something is amiss within your engine or emissions system. It requires further investigation.
The Silent Language of Your Car: What the Check Engine Light Communicates
Understanding the Malfunction Indicator Lamp (MIL)
Your vehicle's engine control unit (ECU) is a powerful computer that constantly monitors various sensors strategically placed throughout your car's engine, transmission, and emissions systems. These sensors feed data to the ECU about everything from engine temperature and oxygen levels in the exhaust to the performance of your catalytic converter and the integrity of your fuel system. When any of these readings fall outside predetermined parameters or a component malfunctions, the ECU registers a diagnostic trouble code (DTC) and illuminates the check engine light to alert you.
The system was primarily designed to ensure your vehicle complies with emissions standards, but it also safeguards critical engine functions. Early detection of issues can prevent minor problems from escalating into major, costly repairs, emphasizing the importance of not ignoring this crucial warning.
Solid vs. Flashing Light: A Crucial Distinction
The behavior of your check engine light provides a vital clue about the urgency of the problem:
A Steady or Solid Light: Investigate Soon
A constantly illuminated (not blinking) check engine light typically indicates a non-emergency issue. While it's important to address it promptly, you can usually continue driving your vehicle for a short period to an auto parts store for a free code scan or to your trusted mechanic. Common causes for a steady light often involve minor emissions-related problems or sensor malfunctions that, while not immediately dangerous, can impact fuel economy or lead to increased emissions over time.
A steady check engine light often indicates an issue requiring attention but not immediate roadside stoppage.
A Flashing or Blinking Light: Immediate Action Required
This is the most critical warning. A flashing check engine light signifies a serious problem that demands immediate attention. Most commonly, it indicates a severe engine misfire, where one or more cylinders are not firing correctly. This allows unburnt fuel to enter the exhaust system, which can rapidly overheat and cause catastrophic damage to your catalytic converter – an extremely expensive component to replace (often $1,000 to $2,500 or more). If your check engine light is flashing:
- Reduce your speed and engine load immediately.
- Avoid heavy acceleration.
- Pull over safely as soon as possible and shut off the engine.
- Consider arranging for a tow to your mechanic to prevent further, more severe damage.
Important Note: If the check engine light is accompanied by other critical warning lights (like the oil pressure light or temperature warning), or if you notice severe symptoms such as engine knocking, significant power loss, or dense smoke, pull over immediately. These are signs of potentially catastrophic failure.
The Usual Suspects: Common Check Engine Light Causes Explored
Demystifying the Most Frequent Triggers
While thousands of potential diagnostic trouble codes can trigger the check engine light, several issues are far more common than others. Understanding these prevalent culprits can often lead to a quicker, less stressful, and more affordable resolution.
1. The Loose or Faulty Gas Cap: The Easiest Fix
This is perhaps the most common and easily remedied reason for a check engine light illumination. Your gas cap does much more than just keep fuel from splashing out; it's a crucial part of your vehicle's Evaporative Emission Control (EVAP) system. It maintains proper pressure within your fuel tank and prevents harmful fuel vapors from escaping into the atmosphere. A loose, damaged, or missing gas cap creates a leak in this sealed system, which the ECU detects as a fault and triggers the light.
- Symptoms: The light often appears shortly after refueling. There might be no noticeable driving issues, though sometimes a faint fuel smell is present.
- Solution: The first step is always to check your gas cap. Remove it, inspect it for cracks or damage, and then securely re-tighten it until you hear several clicks. Drive normally for a few days; the light may reset automatically after a few drive cycles. If the cap is damaged, replacement is inexpensive and straightforward.
2. Failing Oxygen Sensor (O2 Sensor): Impacting Efficiency
Oxygen sensors monitor the amount of unburned oxygen in your vehicle's exhaust gases. This data is critical for the engine's computer to constantly adjust the air-fuel mixture for optimal combustion, fuel efficiency, and reduced emissions. Over time, O2 sensors can become contaminated or simply wear out due to exposure to high temperatures and exhaust chemicals.
- Symptoms: A failing oxygen sensor can lead to a noticeable decrease in fuel economy, a rough idle, or increased emissions. In some cases, there might be no immediate noticeable symptoms other than the light.
- Impact: Driving with a faulty O2 sensor for too long can cause your engine to run too rich or too lean, which can damage your catalytic converter—a much more expensive repair. O2 sensors typically need replacement every 60,000-90,000 miles.
3. Catalytic Converter Problems: A Major Emissions Component
The catalytic converter is a vital part of your exhaust system, responsible for converting harmful pollutants (like carbon monoxide, nitrogen oxides, and hydrocarbons) into less harmful gases before they exit your tailpipe. While designed to last the life of your vehicle, it can fail prematurely due to other unresolved engine issues, particularly prolonged engine misfires or a continuously rich air-fuel mixture that causes it to overheat and melt internally.
- Symptoms: Common signs include reduced engine performance, sluggish acceleration, decreased fuel efficiency, a distinct "rotten egg" smell from the exhaust, or a rattling noise from under the vehicle (indicating internal damage). It will also cause an emissions test failure.
- Solution: Replacing a catalytic converter is one of the most expensive check engine light repairs, often ranging from $1,000 to $2,500+. The key is to address the underlying cause (like misfires or faulty O2 sensors) to prevent future damage.
4. Faulty Spark Plugs, Ignition Coils, or Wires: Misfire Mania
Spark plugs ignite the air-fuel mixture in your engine's combustion chambers. Ignition coils deliver the high voltage to the spark plugs, and spark plug wires (in older systems) transmit this current. When these components wear out or malfunction, they can lead to an engine misfire, meaning one or more cylinders are not firing correctly.
- Symptoms: Engine hesitation, rough acceleration, noticeable engine vibration, reduced power, and decreased fuel economy. A flashing check engine light often points to a severe misfire.
- Solution: Regular maintenance, including replacing spark plugs according to your manufacturer's schedule (typically every 30,000-100,000 miles depending on the type), is crucial. Ignition coils generally last longer but can fail individually. Replacing these components restores proper combustion and significantly improves engine performance.
5. Malfunctioning Mass Airflow (MAF) Sensor: The Engine's Breathalyzer
The Mass Airflow (MAF) sensor measures the amount and density of air entering your engine. This information is crucial for the ECU to calculate and deliver the correct amount of fuel for efficient combustion. A dirty or faulty MAF sensor provides incorrect readings, disrupting the delicate air-fuel balance.
- Symptoms: Can include a rough idle, engine hesitation or stalling, poor acceleration, and decreased fuel efficiency.
- Solution: Sometimes, cleaning the MAF sensor with a specialized MAF sensor cleaner can resolve the issue. If the sensor is truly faulty, replacement is necessary, typically costing $100-$400. Regularly replacing your air filter helps prevent dirt and debris from reaching and contaminating the MAF sensor.
6. Evaporative Emission (EVAP) System Leaks: Beyond the Gas Cap
Beyond the gas cap, other components of the EVAP system can develop leaks. This system captures fuel vapors from the fuel tank and stores them until the engine can burn them, preventing them from escaping into the atmosphere. Components like vacuum hoses, the purge valve, and the vent valve can crack, clog, or fail.
- Symptoms: Often, the only symptom is the check engine light itself, though sometimes a subtle fuel odor might be present. Performance issues are less common with EVAP leaks unless they are very severe.
- Solution: Diagnosis often involves a "smoke test" by a mechanic to pinpoint the exact leak location. Repair might involve replacing a cracked hose, a faulty purge solenoid, or a vent valve.
7. Thermostat or Engine Temperature Faults: Maintaining Optimal Heat
The thermostat regulates your engine's operating temperature, ensuring it reaches and maintains an optimal level for efficiency and performance. A faulty thermostat (stuck open or closed) or a malfunctioning engine coolant temperature (ECT) sensor can cause the engine to run too cool or overheat, triggering the check engine light.
- Symptoms: An engine running too cold might result in poor fuel economy and inefficient heater performance. Overheating is a serious issue that can lead to catastrophic engine damage. The temperature gauge on your dashboard might give clues.
- Solution: Replacing a faulty thermostat is typically a straightforward repair. Ensuring adequate coolant levels and checking for leaks in the cooling system are also critical steps.
8. Battery and Charging System Issues: Electrical Confusion
While not a direct engine component failure, a weak or dying battery, a faulty alternator, or poor electrical connections can lead to voltage irregularities. Modern vehicles are highly sensitive to stable voltage, and fluctuations can cause various sensors to report incorrect data, confusing the ECU and triggering the check engine light with multiple "ghost" codes.
- Symptoms: Slow cranking during start-up, dim headlights, random dashboard warning lights (not just the check engine light), or the battery light itself might illuminate.
- Solution: Regularly test your battery and charging system (alternator). Ensure battery terminals are clean and tight. Addressing voltage issues often clears multiple seemingly unrelated codes.
Decoding the Dash: When to Worry and When to Simply Act
Severity Spectrum of the Check Engine Light
The check engine light is designed to reduce your anxiety by providing an early warning, but knowing when to act quickly is paramount. Here's a practical guide to understanding the urgency:
Don't Panic If:
- The light came on immediately after refueling.
- The light is steady (not flashing), and your car is driving completely normally (no loss of power, strange noises, or smells).
- No other warning lights are illuminated on your dashboard.
In these cases, try the gas cap fix and drive for a few cycles. If the light remains, proceed with scanning the codes.
Act Fast and Pull Over If:
- The check engine light is flashing or blinking rapidly.
- You feel severe engine misfires, jerking, loss of power, or rough running.
- You notice the temperature gauge rising rapidly or the oil pressure light illuminating.
- There's dense smoke from the exhaust or a strong burning smell.
- Your car is making loud knocking or pinging noises.
These symptoms indicate a serious problem that could lead to significant damage if ignored. Reduce speed, find a safe place to pull over, and arrange for professional assistance or a tow.
Your Diagnostic Playbook: Step-by-Step to a Solution
From Gas Cap to Code Reader: How to Approach the Problem
Once the check engine light appears, a systematic approach helps you accurately diagnose and resolve the issue. Don't jump to conclusions or expensive repairs without proper investigation.
Step 1: The Basic Visual Check (and the Gas Cap)
Before you do anything else, perform a few simple checks:
- Check your gas cap: Remove it, inspect the rubber seal for cracks, and then re-tighten it until you hear several clicks. This alone resolves a significant percentage of check engine light issues.
- Observe your vehicle: Note any unusual sounds, smells, or changes in performance. Does the engine feel rough? Is there smoke? Any leaks under the car?
- Check fluid levels: While not always a direct trigger, extremely low engine oil, coolant, or transmission fluid can sometimes lead to the light illuminating, or indicate other underlying problems.
- Inspect for obvious issues: Look for loose or disconnected vacuum hoses, cracked belts, or unplugged electrical connectors.
Step 2: Get Your Diagnostic Trouble Codes (DTCs) Read
This is the most crucial step in diagnosing the check engine light. Your car's ECU stores specific codes that point to the system or component where the fault was detected. You have a few options for reading these codes:
- Auto Parts Stores: Many major auto parts retailers (like AutoZone in the US) offer free diagnostic code reading services. They'll plug in an OBD-II scanner and give you the codes.
- Personal OBD-II Scanner: You can purchase an affordable OBD-II scanner online or at auto parts stores for $20-$100+. These devices plug into your car's OBD-II port (usually located under the dash on the driver's side) and display the codes. More advanced scanners can also provide live data and allow you to clear codes.
- Professional Mechanic: If you prefer not to DIY, your mechanic can read the codes and provide a professional diagnosis, though this often comes with a diagnostic fee.
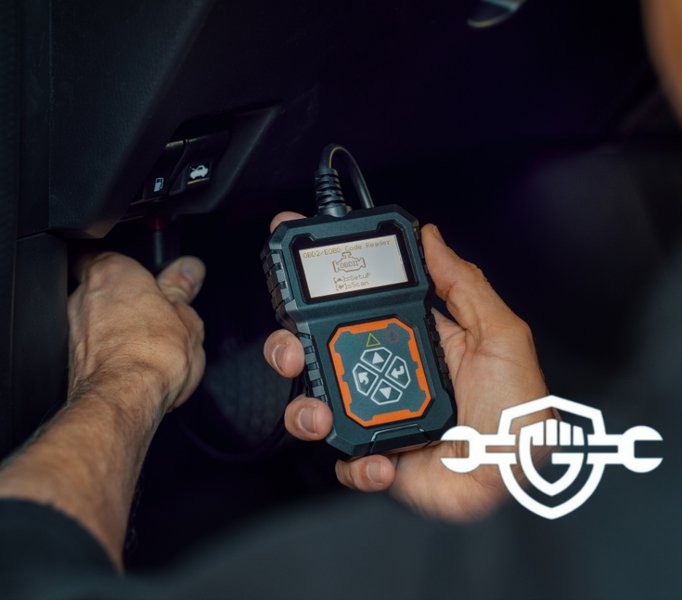
An OBD-II scanner is an indispensable tool for retrieving specific diagnostic trouble codes (DTCs).
Step 3: Interpret the Codes and Symptoms
Once you have the DTCs (e.g., P0420, P0301, P0171), research what they mean. The scanner's manual, online databases, or a quick search will provide detailed descriptions. Remember:
“A code points you in the right direction. Your eyes and simple tests confirm the real problem.”
For example, a P0420 code (Catalyst System Efficiency Below Threshold) doesn't always mean your catalytic converter is bad. It could be an upstream oxygen sensor causing incorrect readings that mimic a faulty converter.
Step 4: Address the Underlying Issue
Based on the codes and any observable symptoms, you can then proceed with repairs. Some minor issues, like replacing a gas cap or cleaning a MAF sensor, might be DIY-friendly. More complex problems, especially those involving catalytic converters, O2 sensors, or internal engine components, usually require professional expertise.
Important Note: Simply clearing a code without addressing the root cause will only provide a temporary fix, and the light will almost certainly return.
Step 5: Monitor Your Vehicle After the Fix
After performing a repair, drive your vehicle for a few days to ensure the light stays off and the problem is resolved. Your car's monitoring systems need several "drive cycles" (specific driving conditions involving engine temperature changes, varied speeds, and periods of consistent driving) to run their self-tests and confirm the fix. If the light goes off, you've likely succeeded! If it returns, further diagnosis may be needed.
Common Causes Compared: Urgency, DIY Potential, and What to Expect
A Snapshot of Check Engine Light Scenarios
To help you quickly gauge the situation, here's a comparative overview of common check engine light causes, their typical urgency, DIY difficulty, and initial steps you can take.
| Cause | Typical Urgency | DIY Difficulty | What to Try First | Average Repair Cost (Approx.) |
|---|---|---|---|---|
| Loose Gas Cap / EVAP Small Leak | Low | Very Easy | Tighten/replace cap, drive a few cycles | $0 - $30 (for new cap) |
| Oxygen Sensor (O2 Sensor) | Medium | Moderate | Confirm code, inspect wiring, replace sensor | $100 - $400 |
| Spark Plugs / Ignition Coils (Misfire) | High (if flashing) | Moderate | Replace plugs; swap coils to isolate a bad one | $100 - $600 |
| Mass Airflow (MAF) Sensor / Intake Leak | Medium | Moderate | Clean MAF; inspect/fix cracked intake boots/hoses | $100 - $400 |
| Catalytic Converter Efficiency Fault | High (if misfire present) | Advanced | Address root cause (misfires, O2 sensors) first | $1,000 - $2,500+ |
| EVAP System Leaks (beyond cap) | Medium | Moderate to Advanced | Smoke test to find leaks; replace valves/hoses | $150 - $600+ |
| Thermostat / Cooling System Fault | High (if overheating) | Moderate | Verify coolant level, replace thermostat/sensor | $100 - $500 |
| Battery / Charging System Irregularities | Medium | Easy to Moderate | Load-test battery; check charging voltage/terminals | $150 - $800+ |
Consequences of Ignoring the Warning: Why Prompt Action Matters
The Hidden Costs of Neglect
While the check engine light can sometimes indicate a minor problem, ignoring it is never a wise decision. Even seemingly small issues can escalate into significant and costly repairs if left unaddressed. The light is your car's early warning system; neglecting it is akin to ignoring a smoke detector in your home.
- Decreased Fuel Efficiency: Many issues that trigger the light, such as a faulty O2 sensor, MAF sensor, or engine misfires, disrupt the optimal air-fuel mixture. This leads to your engine running inefficiently, burning more fuel than necessary, and costing you more at the pump.
- Increased Emissions: The check engine light is primarily emissions-related. Problems with O2 sensors, EVAP systems, or catalytic converters mean your vehicle is polluting more than allowed, contributing to environmental harm, and potentially failing emissions tests in areas where they are required.
- Escalation of Problems: A minor issue can quickly become a major one. A small vacuum leak, if left unattended, can lead to your engine running lean, which can damage internal engine components. A prolonged misfire, as mentioned, can destroy an expensive catalytic converter.
- Catastrophic Engine Failure: In the most severe cases, ignoring a flashing check engine light or critical accompanying symptoms like overheating or low oil pressure can lead to irreversible engine damage, requiring a complete engine replacement – an extremely costly repair.
- Failed Inspections: In many regions, an illuminated check engine light is an automatic failure during vehicle safety or emissions inspections, preventing you from legally renewing your registration.
- Reduced Resale Value: A vehicle with a persistent check engine light will undoubtedly have a lower resale value, as potential buyers will factor in the cost and hassle of diagnosis and repair.
“Many drivers ignore the light for weeks, only to find it was a cheap fix. Don't wait—early action saves money.”
Empowering DIY: Simple Fixes You Can Tackle Today
Hands-On Solutions for the Confident Car Owner
Once you've identified the diagnostic trouble code, you might find that some common check engine light causes are within your capabilities to fix, saving you money on labor costs. Always ensure you have the right tools, follow safety procedures, and consult your vehicle's service manual.
1. Tightening or Replacing the Gas Cap
As covered, this is the easiest. Inspect the cap for any visible damage to the rubber seal. If it's cracked or worn, purchase a new OEM (Original Equipment Manufacturer) or high-quality aftermarket cap specifically for your vehicle. Screw it on until it clicks several times. The light may not clear immediately but should extinguish after a few drive cycles.
2. Cleaning a Dirty Mass Airflow (MAF) Sensor
If your MAF sensor code points to contamination, you can often clean it yourself:
- Safety First: Disconnect the negative terminal of your car battery before starting.
- Locate and Remove: The MAF sensor is typically located in the air intake tube between the air filter box and the throttle body. Use the correct screwdriver or socket to carefully remove it.
- Spray, Don't Touch: Using only a specialized MAF sensor cleaner (available at auto parts stores), generously spray the delicate sensing wires or hot film elements. Never touch these components with your fingers or anything abrasive.
- Dry and Reinstall: Allow the sensor to air dry completely (this usually takes 10-15 minutes). Reinstall it carefully, ensuring all connections are secure. Reconnect the battery.
3. Replacing Worn Spark Plugs and Wires/Coils
If misfire codes appear, replacing spark plugs is a common DIY task:
- Cool Engine: Always work on a cold engine to prevent stripping threads in the cylinder head.
- One by One: Replace spark plugs one at a time to avoid mixing up ignition coil or wire order.
- Gap and Torque: Ensure new spark plugs are gapped correctly (check your owner's manual or a reliable source). Use a torque wrench to tighten them to the manufacturer's specification.
- Dielectric Grease: Apply a small amount of dielectric grease to the inside of spark plug boots or coil-on-plug connectors to prevent moisture and ensure a good electrical connection.
This video offers practical tips and simple fixes for common check engine light issues, helping you diagnose problems without immediate panic.
This embedded video, titled "Check Engine Light ON? Here's 10 Simple Fixes (Don't Waste ...)", directly complements our discussion on DIY solutions. It provides visual demonstrations and additional insights into how to troubleshoot and resolve common check engine light issues, ranging from checking your gas cap to more involved sensor replacements. The video reinforces the actionable advice given in this section, making the troubleshooting process more accessible and less daunting for the average car owner.
4. Checking for Vacuum Leaks (Simple Method)
Sometimes, a hissing sound under the hood or a lean code (P0171/P0174) points to a vacuum leak. Visually inspect all rubber hoses connected to the intake manifold for cracks, disconnections, or deterioration. A simple (and cautious) method for finding small leaks is to spray a small amount of non-flammable carburetor cleaner or starting fluid around suspicious areas while the engine is running. If the engine idle briefly changes, you've likely found a leak.
Remember: Always confirm the diagnosis with your code reader and observe symptoms before replacing parts. Avoid "parts darts"—randomly replacing components hoping to fix the problem.
The Professional Touch: When to Call in the Experts
Knowing Your Limits and Protecting Your Investment
While many simple fixes are within reach for the DIY enthusiast, some check engine light causes require the specialized tools, expertise, and diagnostic equipment found at a professional automotive shop. Knowing when to seek professional help is crucial for both your safety and your wallet.
- Flashing Light or Severe Symptoms: As discussed, a flashing light or any severe driving symptoms (loss of power, smoke, overheating) warrant immediate professional attention. Driving with these issues can cause irreparable damage.
- Complex Diagnostic Codes: Some DTCs point to intricate electrical issues, internal engine problems, or advanced emissions system failures that require specialized diagnostic equipment and in-depth knowledge beyond basic OBD-II scanners.
- Lack of Tools or Experience: If you don't have the necessary tools (e.g., specialized torque wrenches, smoke machines for EVAP leaks) or feel uncomfortable performing a repair, it's always best to entrust the job to a certified mechanic.
- Persistent or Recurring Issues: If you've attempted a fix, cleared the code, and the check engine light returns for the same issue, it indicates a deeper problem that requires a professional's diagnostic prowess.
- Pre-Purchase Inspection: If you're buying a used car, a professional pre-purchase inspection can uncover hidden check engine light causes that might not be immediately apparent.
Choosing a Trustworthy Repair Shop
When professional help is needed, selecting the right repair facility is key:
- Look for Certifications: Seek out shops with ASE (Automotive Service Excellence) certified technicians. This indicates a commitment to professional standards and ongoing training.
- Check Reviews and Recommendations: Online reviews and word-of-mouth recommendations from trusted friends or family can guide you to reputable shops.
- Get Multiple Estimates: For major repairs, consider getting estimates from two or three different shops. Be wary of significantly lower or higher prices compared to the average.
- Ask About Warranties: A reliable shop will offer warranties on parts and labor, providing peace of mind after the repair.
- Clear Communication: A good mechanic should explain the problem in understandable terms, provide a detailed estimate before beginning work, and answer all your questions patiently.
Prevention is Key: Keeping the Check Engine Light at Bay
Proactive Maintenance for a Happy Car
The best way to deal with the check engine light is to prevent it from ever illuminating. Regular, proactive vehicle maintenance is your strongest defense against unexpected warnings and costly repairs.
- Adhere to Your Manufacturer's Schedule: Your owner's manual contains a detailed maintenance schedule. Following it diligently ensures that critical components like spark plugs, filters, and fluids are replaced or inspected at appropriate intervals.
- Regular Oil Changes: Fresh engine oil lubricates components, dissipates heat, and prevents sludge buildup. Dirty oil can lead to various engine issues, some of which can trigger the check engine light.
- Timely Spark Plug Replacement: Worn spark plugs cause misfires. Replacing them on schedule ensures efficient combustion and prevents strain on your ignition coils and catalytic converter.
- Air Filter Checks and Replacement: A clogged air filter restricts airflow, which can negatively impact fuel economy and potentially lead to MAF sensor issues. Change your air filter every 12,000-15,000 miles or as recommended.
- Fuel System Maintenance: Use quality fuel (as recommended by your manufacturer) and consider using a reputable fuel system cleaner periodically to prevent carbon buildup on injectors and valves.
- Check and Tighten Your Gas Cap: Make it a habit to tighten your gas cap until it clicks every time you refuel. This simple action prevents one of the most common check engine light triggers. Replace old or cracked caps.
- Monitor Fluid Levels: Regularly check your engine oil, coolant, transmission fluid, and power steering fluid. Low levels can indicate leaks or other problems that can indirectly affect engine performance and trigger the light.
- Inspect Hoses and Belts: Periodically check under the hood for cracked, brittle, or bulging hoses and frayed belts. Addressing these early can prevent vacuum leaks, cooling system failures, or accessory component issues.
- Battery Health Checks: Have your battery load-tested annually, especially before winter. A weak battery can cause voltage fluctuations that confuse the ECU and trigger spurious codes.
Frequently Asked Questions About the Check Engine Light
Conclusion
The check engine light, while initially a source of concern, is ultimately your vehicle's way of communicating. By understanding its meaning, recognizing the common check engine light causes, and knowing when to take immediate action versus when to schedule a diagnosis, you can approach this warning with significantly less anxiety and more confidence. Whether it's a simple gas cap fix or a more involved sensor replacement, addressing the issue promptly is paramount. It ensures your vehicle runs smoothly, maintains optimal fuel efficiency and emissions, and prevents minor problems from escalating into costly, catastrophic failures. Don't ignore this vital message from your car – a little attention now can save you a lot of headache and money down the road.
